
This guide will walk you through to the steps to setup an Android device to be able to invoke ps4-waker through tasker in a rooted or non rooted device.
PS4-Walker is a NodeJS program developed by Daniel Leong that allows you to command your PS4 from another device.
It is probably easier to setup a Respberry Pi since it can run Linux natively (there are guides out there of how-to), but this guide will show you to work it out without a Raspberry, by giving a new use to an old spare Android device or with your current Android TV box, plus, how to setup programs to hook it up with your Google Home or Google Assistant (and probably to Alexa aswell).
It takes several steps so ill try to be as clear as possible how this can be done. At the end, youll be able to “Ok Google, turn ps4 on” or “Ok Google, start Youtube”.
What you will need:
- A PlayStation4 (any model)
- A Google Home (or the google assitant in your personal phone)
- A Android TV Box or spare Android device (the one you used in 2016 with a cracked screen that you’ve in some dusty drawer, no root is needed)
- A computer/laptop, needed only once during setup (This guide explains how to do it with Windows 10, but any OS works. If your spare phone happens to be rooted, then you don’t need a computer at all).
- Everything connected to the same router.
We will be using the following Android apps:
PS4 Second Screen, Termux, Termux: Tasker plug in, Tasker.
And we will be installing this software:
PS4-Waker, NodeJS
Part 1 – Setting up Play Station 4 Second Screen
You’ll probably want to wipe your spare phone first for a fresh start. If so, go ahead but then setup the same Google account that you use with your Home assistant. Also, connect it to the same router as your PlayStation 4.
- Install PS4 Second Screen from Play Store in your spare phone
- Turn on your PS4 and go to Settings > Mobile App Connection Settings > Add Device
- On PS4 Second screen, wait for the device to show up in the device list screen and select it (you can refresh the list using the 3 dots).
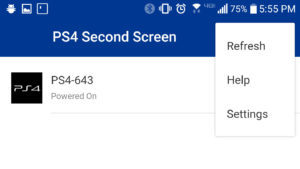
- Copy the code from your PS4 screen into your PS4 Second Screen App.
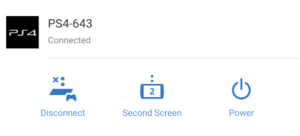
- Try to control your PS4 from the app. If everything works fine, click on Disconnect to go back to the device list screen. Leave it there for now.
Part 2 – Installing Termux
Termux and the tasker plugin can be obtained either from Google Play Store, or F-Droid, but keep in mind you need to install both programs from the same source for them to work together. Intalling from Google Play Store is way easier, but the plugin is not free ($2.06), while installing from F-Droid is free but means you’ll need to give permission to install from unknown sources, what ever floats your boat.
- Install Termux in your spare Android from Google Play (easy but later youll need to play $2.06) or from F-Droid (a tiny bit more of a hassle but free).
- Open Termux and and run theese commands to update its internal software and to give it access to Android’s storage:
pkg update
pkg upgrade
apt-get update
termux-setup-storage
Note: Android will ask permission to access storage, please accept it.
- This step is optional. If you dont want to be typing all theese commands on the small akward android keyboard, you can connect your computer to Termux and then just copy-paste them from this blog. Here is how: http://www.engabao.com/control-termux-remotely-from-a-computer
- Now we need to install Nano to edit scripts, NodeJS installer, and then PS4-Waker, run this commands in the Termux terminal
pkg install nano
pkg install nodejs
npm install ps4-waker -g
- Since Termux uses a non conventional structure, we need to patch PS4-Waker with this command for it to work when called from Tasker later on:
termux-fix-shebang ~/../usr/bin/ps4-waker
Part 3 – Getting credentials from PlayStation Second Screen app
If your phone happens to be rooted, you dont need a laptop, click on the “Rooted” tab and follow those steps wich are simplier. If its nor rooted or if you dont know, you’ll need a laptop and follow the steps on the “Non Rooted” tab.
Ill explain how to get PS4 credentials by installing NodeJS on a computer with Windows 10. There are many guides on the web for doing this in Linux and Mac, wich is probably easier.
- Go to Node.js website on a Windows 10 computer and download the installer ending with LTS
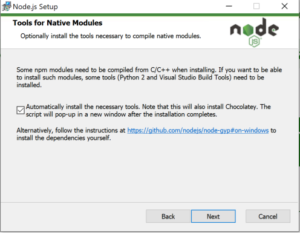
- Open the installer and follow the wizard. There is no need to install "necesary tools" so uncheck that if checked.
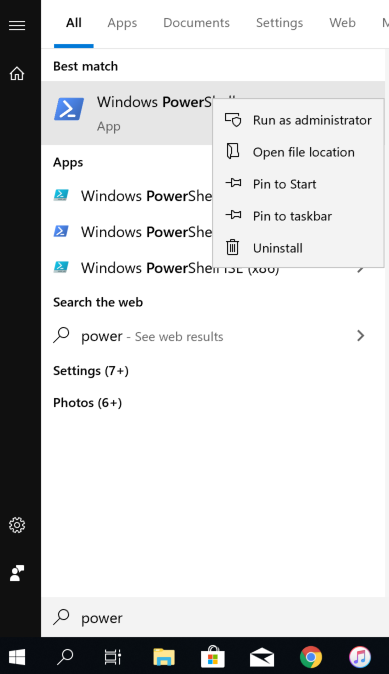
- After the instalation we need to open Windows PowerShell with administrator rights, to do this, click on the "start" windows logo button and type in power. Youll see the Windows PowerShell listed, right-click over it and choose Run as administrator.
- Turn on your PS4 and go to Settings > Mobile App Connection Settings > Add Device. You'll see a pin code on your PS4 screen. In the blue PowerShell window that poped up in your computer, type the following commands:
set-executionpolicy remotesigned
npm install ps4-waker -g
ps4-waker
Note: Youll need to press Y (for yes) and hit enter when promped.
- On your computer's PowerShell, youll see a message saying "PS4 Waker" device should now be available... Go to "PlayStation Second Screen" on your spare Android phone, and go back to the device list (With the Disconnect button, if you didnt already). This time you should choose PS4-Waker from the list (remember you can use the refresh option under the 3 dots).
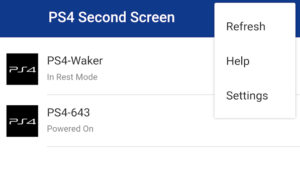
- It will stay with a Connecting.. status, thats normal. Give it arround 5 seconds and check your computer's PowerShell. If credentials where gathered, there should be some green codes on your screen and a message Pin Code >, type in the code shown on your PS4 Screen withoud spaces and hit enter. You should get a message Logged into device! ...

- Now we need to copy the credentials from your computer to your spare unrooted Android device. Since PowerShell is already open, lets just run a command to copy the credentials to your desktop to make them easier to find (or you can skip this and just go to your user Home):
copy $env:HOMEPATH\.ps4-wake.credentials.json $env:HOMEPATH\Desktop
- Look for the file .ps4-wake.credentials.json on your desktop, right click over it and select Copy. We need to copy it to your phone's "internal memory" directory (not the sdcard), so plug in your spare phone to your computer via USB (or you can send it by mail, download it on your phone and copy it to the root of internal memory).
- Now open the file explorer (Keyboard shortcut is Win+e) and go to "This PC". Scroll the list untill you see MTP USB Device. Double click on it.
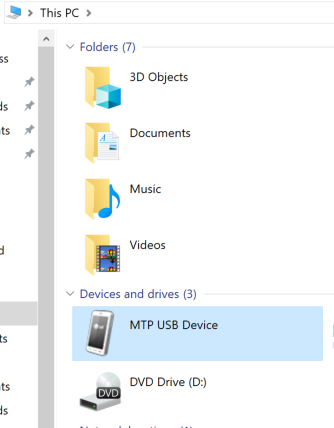
NOTE: You may need to grant permissions on your phone and/or choose the correct USB setting (MTP) for it to show up on your computer.
10. Now double click on "Internal Storage" and paste the file you copied in there.
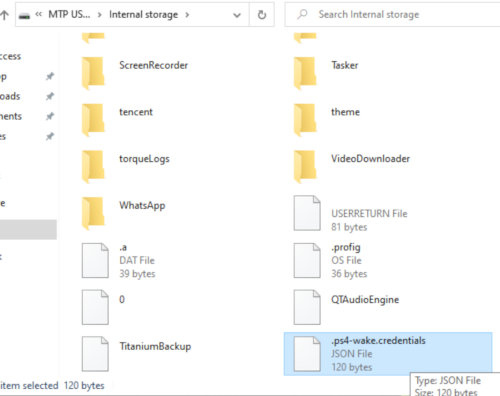
NOTE: We are done with the computer credentials part. You can unplug your Android device from your computer now, turn off your computer and put it away.
- Run this commands on Termux in your Android device (do not type the starter $ or # character, they are for reference)
$ pkg install tsu
$ tsu
# ps4-waker
- Now youll see a message on Termux saying "PS4 Waker" device should now be available... , start Second Screen app on the device again, and go back to the device list (With the Disconnect button, if you didnt already). This time you should choose PS4-Waker (remember you can use the refresh option under the 3 dots).

- It will stay with a Connecting.. status, thats normal. Give it arround 5 seconds and go back to Termux. If credentials where gathered, there should be some green codes on your screen and a message Logged into device! ...Lets copy this credentials to Android memory out of the root realm, so that ps4-waker can be used without root from now on.
cp ~/.ps4-wake.credentials.json ~/../storage/shared
exit
Part 4 – Setting up a script for Tasker
Now that we have the credentials on the correct place, lets try to see if it is working and then lets make a script to execute commands later on from tasker
- On your spare Android device Termux terminal, type this:
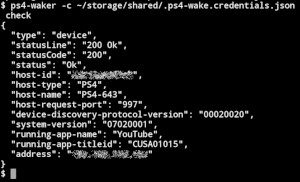
ps4-waker -c ~/storage/shared/.ps4-wake.credentials.json check
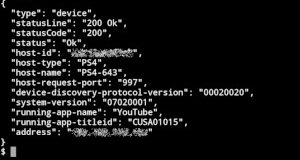
If you get info similar to this from your PS4, congratulations:
- Now we need to create a path where our scripts will be accessed from the Tasker app, enter it and create a script. To do this, type the following commands:
mkdir -p ~/.termux/tasker
cd ~/.termux/tasker
nano ps4w-script.sh
- Youll see an empty black screen with the title GNU nano and some commands at the bottom, enter the following text on that screen (be very carefull with spaces and symbols):
#!/data/data/com.termux/files/usr/bin/env bash
ps4-waker -c ~/storage/shared/.ps4-wake.credentials.json $1 $2
- At the bottom of the black screen, but over your keyboard, there is the word CTRL, press it once (word should turn blue) and then press letter S on your keyboard, this is for saving.
- Now press CTRL again and then hit X on your keyboard to exit the GNU nano screen.
- We need to set the script that we just created as executable, to do so, enter this command:
chmod +x ps4w-script.sh
11. Now lets check if it works, type this:
./ps4w-script.sh check
If you get a screen like this, you’re awesome!
Part 5, Get tasker to execute the Termux script
Now that we know our script is working, its time to install and setup Tasker and the Termux plugin for tasker. Please install the plugin from the same source you installed Termux from. Also install Youtube on your PS4 if you dont have done it already, we will use it to test.
- Install Tasker from the Google Play Store
- Install Termux: Tasker plugin either from Google Play or F-Droid.
- Open Tasker, go to the Task tab and hit the Plus circle on the lower-right of the screen. Enter PS4W-Youtube on the name box and hit the check symbol.
- On the Task Edit screen, hit the Plus circle again and type in termux. Then tap on the Termux item with a little black icon.
- Hit the pencil next to Configuration and type ps4w-script.sh in the Executable in field
- Type start CUSA01015 in the Arguments field.
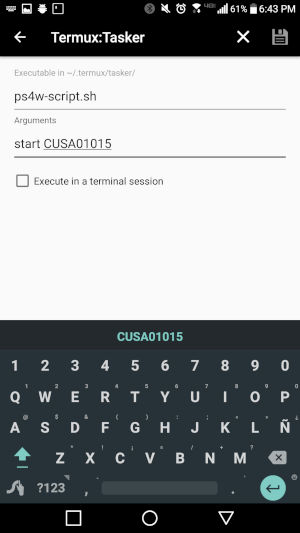
- Now touch the disk icon to save and then hit the back button. On the lower left there is a play button.. keep and eye on your PS4 screen and hit the play button on Tasker on the Android phone, Youtube should start.
- Go all the way back to the Tasks tab home screen, and hold PS4W-Youtube until the backgroud color changes meaning its selected. Hit the 3 dots on the top-right and choose Clone. Enter a new name like PS4W-On, tab on it, then on 1. Termux, then on the pencil again. Empty the field Arguments since no arguments will just turn on PS4. Repeat step 8 to create more tasks. Here is a list of commands:
osk-submit text (Types the word text)
remote up (up, down, left, right, enter, back, option and ps are valid)
standby (Enter rest mode)
start <title ID> (Use https://ps4database.io/search to search for title IDs)
Part 6, Hooking Tasker to your google Assistant
In order to execute commands from your google assistant to tasker.. you will need to either use IFTTT or AutoVoice.
Ive make an aditional guide for AutoVoice here. (Recommended since its instant)
Thats it. You just added Google Home Assistant voice commands functionality to your PS4 thanks to that old device youre not using anymore for free or for almost free. Create as many commands as you want to put your PS4 to rest or to open your favorite game… or integrate it into a full automation solution via Google Home app routines to turn off the lights, close the curtains, turn on the PS4, start Netflix and bring you popcorn.. if you own the hardware that is. IFTTT also supports Alexa, so, even tho I do not own an Amazon Echo to test it myself, im pretty sure its very simple to get it working aswell.

![How to use an existing iOS project to start a new one (renaming) [XCode 8.1]](https://engabao.com/wp-content/uploads/2016/11/375784853_150_150.jpg)




did everything but my ps4 doesn’t do anything
What command would i use in part 5 step 8 to power off the ps4. Ive gone through trial and error but cant figure it out. Thanks for this tutorial!
use the standby command
does this only work if the ps5 is in rest mode and not turn off?
Ive only tested in PS4. Yes it needs to be in rest mode and not off