Tuya smart devices are cheap, easy to get and they just work. A lot of different brands follow their protocols and design their own apps that look a lot like Tuya’s own application.
One of theese many apps, that I personally use is Smart Life. Tuya smart apps keep a lot of security under their hoods, but some older versions are a bit less secure.
We will use an older Smart Life app to get some info from a device during its setup, and then use that info to turn on and off that device from Tasker with the help of Termux.
Personally, I will use a spare old android phone as a home hub to get commands from Google Home via Autovoice, but this also works in your everyday Android phone or likely form a AndroidTV Box. No root is needed.
What you will need:
An Android device
A Tuya smart compatible device like a smart plug
A strong Wi-Fi signal on both devices
We will be using the following Android apps:
Smart Life 3.12.6 (this is an older version), Packet Capture, Termux, Termux: Tasker plug in, Tasker.
And we will be installing this software:
tuya-cli, NodeJS
Part 1 – Setting up older Smart Life app and getting smart device info
For this section, youll need to install an older version of Smart Life. If you already use Smart Life app, you’ll have to uninstall it. Keep in mind that if you use another app like Tuya Smart, the devices you register in Smart Life will dissapear from the former. You can update to the most recent Smart Life when youre done getting your smart device’s info and keep your registered devices. Its a good idea to have a spare android phone with the outdated app tho, to add more devices in the future.
- Install Smart Life 3.12.6 from Apk Mirror.
- Install Packet Capture from Google Play Store.
- Open Packet Caputure and follow its setup. It will request you to install a certificate and do so automatically.

Part 2 – Finding required parameters
We are now ready to capture your smart device’s info. If your device is already added in the Smart Life app, youll need to delete it first.
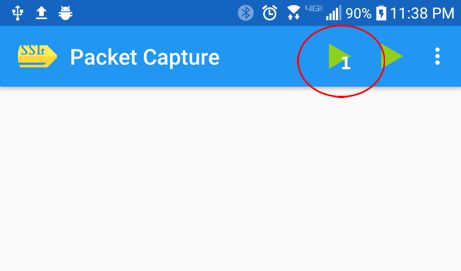
- Open Packet Capture app and click over the green play button with a number “1” over it.
- Write “smart life” on the top search bar and choose it from the list
- Now open the Smart Life app you installed previously, remove the smart device if you have it listed, and add the device by following the on screen instructions.
- Once the device is added, switch back to Packet Capture and hit the red square stop button on the top to stop recording.
- Click on the white space where where the current date and time appear. You’ll see a list of captured data. This part is a little tedius, you’ll need to check the items on the list of the captured packets (normally between 2kb and 10kb) and find where the new device name and MAC address are stored. You’re looking for something that appars like the document bellow.
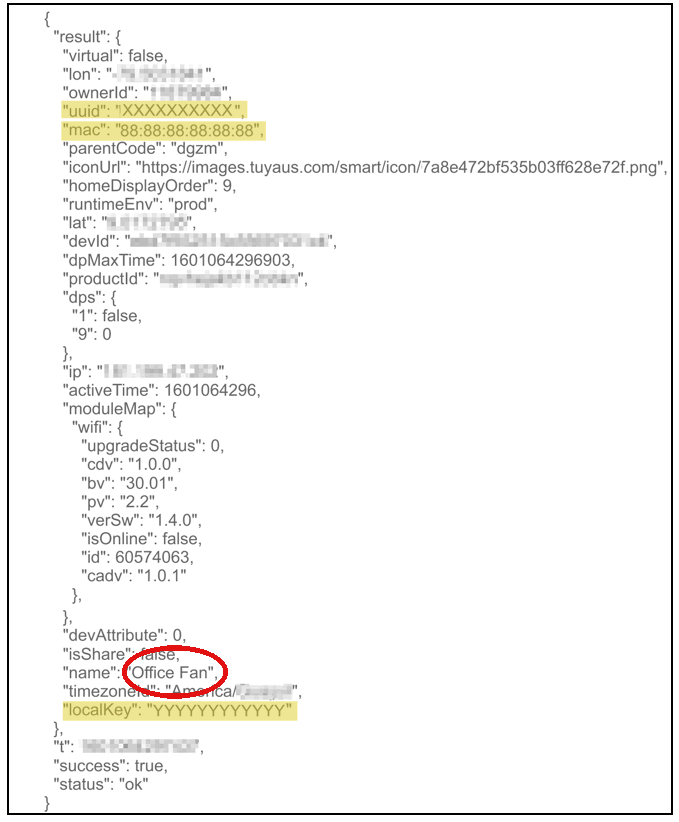
- Take note of the following info (as highlighted in yellow in the picture above): uuid, mac and localKey. For this example, we will use XXXXXXXXXXX as the uuid, 88:88:88:88:88:88 as the mac, and YYYYYYYYYYYY as the localKey.
Note: Dont register the smart device that you want tasker to control on any other app or it will stop working. Use an updated version of Smart Life instead.
Part 3 – Setting up Termux and tuya-cli
Termux and the tasker plugin can be obtained either from Google Play Store, or F-Droid, but keep in mind you need to install both programs from the same source for them to work together. Intalling from Google Play Store is way easier, but the plugin is not free ($2.06), while installing from F-Droid is free but means you’ll need to give permission to install from unknown sources, what ever floats your boat.
- Install Termux in your Android from Google Play (easy but later youll need to play $2.06) or from F-Droid (a tiny bit more of a hassle but free).
- Open Termux and and run theese commands to update its internal software:
pkg update
pkg upgrade
apt-get update
- This step is optional. If you dont want to be typing all theese commands on the small akward android keyboard, you can connect your computer to Termux and then just copy-paste them from this blog. Here is how: http://www.engabao.com/control-termux-remotely-from-a-computer
- Now we need to install Nano to edit scripts, NodeJS installer, and then tuya-cli, run this commands in the Termux terminal
pkg install nano
pkg install nodejs
npm i @tuyapi/cli -g
- Since Termux uses a non conventional structure, we need to patch Tuya-CLI with this command for it to work when called from Tasker later on:
termux-fix-shebang ~/../usr/bin/tuya-cli
Part 4 – Assembling the script
We will now create a script to test and control your smart device from the Termux terminal. But first we will need to guess what version your device is running.
- We will use the mac data we extracted before to obtain your device’s ip address by writting this command in Termux (replace 88:88:88:88:88:88:88 with the mac you obtained):
arp -a | grep "88:88:88:88:88:88"
- In the terminal, you’ll now see inside a parentheses an IP address that looks like 192.168.0.0 or 10.0.0.0 or 172.0.0.0. Write it down. For this example we will use 192.168.0.1
- Write the following command in the Termux console (replace XXXXX for the uuid you got, YYYYY for the localKey and 192.168.0.1 for the IP address you obtained from the previous step):
tuya-cli set --id XXXXXXXXX --key YYYYYYYYY --ip 192.168.0.1 --dps 1 --set true --protocol-version 3.3
Note: “true” indicates the device to power on. If you change it to false, the command will try to power it off. Changing dps to another number will turn on or off a different socket, gang or led if the device has more than one.
- If you device did power on (or off) and terminal now shows “Set succeeded.”, great! you can keep going to the next step. If the terminal screen shows something else (that looks like an error), try changing protocol-version to 3.2 or 3.1 or de dps to another value. For example I found a bulb that uses dps 22.
- Now that we can control the smart device from the terminal, we need to create a path where our scripts will be accessed from the Tasker app, enter it and create a script. To do this, type the following commands:
mkdir -p ~/.termux/tasker
cd ~/.termux/tasker
nano mytuyadevice.sh
Note: You can use any descriptive name you like instead of mytuyadevice.sh like i.e. bedroom-lamp.sh, but remeber what your name was and change the following scripts accordingly
- Youll see an empty black screen with the title GNU nano and some commands at the bottom, enter the following text on that screen (be very carefull with spaces and symbols):
#!/data/data/com.termux/files/usr/bin/env bash
tuya-cli set --id XXXXXXXX --key YYYYYYYYY --ip 192.168.0.1 --protocol-version 3.3 --dps $1 --set $2
Note: again, replace XXXX, YYYY and 192.168.0.1 with your own uuid, localKey and IP address. The script is just 2 lines (web breaks it into 3 sometimes), were the one with the sharp # is the first line, and the one starting with tuya-cli is the second line.

- At the bottom of the black screen, but over your keyboard, there is the word CTRL, press it once (word should turn blue) and then press letter S on your keyboard, this is for saving.
- Now press CTRL again and then hit X on your keyboard to exit the GNU nano screen.
- We need to set the script that we just created as executable, to do so, enter this command:
chmod +x mytuyadevice.sh
- Now lets check if it works with this command:
./mytuyadevice.sh 1 true
Note: Number 1 stands for the first socket/gang/led, true stands for on.
11. If your device is changing states and you get the message “Set succeeded.” on the terminal, we are all set for the final part!
Part 5 – Connecting Termux with Tasker and runing task
Now that we know our script is working, its time to install and setup Tasker and the Termux plugin for tasker. Please install the plugin from the same source you installed Termux from.
- Install Tasker from the Google Play Store
- Install Termux: Tasker plugin either from Google Play or F-Droid.
- Open Tasker, go to the Task tab and hit the Plus circle on the lower-right of the screen. Enter MyTuyaDeviceON on the name box and hit the check symbol (or anything related to your device).
- On the Task Edit screen, hit the Plus circle again and type in termux. Then tap on the Termux item with a little black icon.
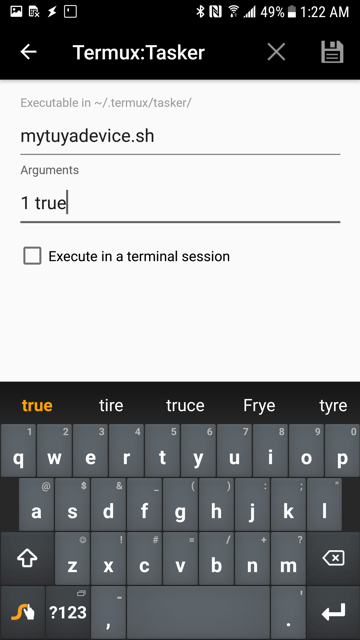
- Hit the pencil next to Configuration and type mytuyadevice.sh (or what ever you called your script) in the Executable in field
- Type 1 true in the Arguments field.
- Now touch the disk icon to save and then hit the back button. On the lower left there is a play button.. keep and eye on your smart device and hit the play button on Tasker on the Android device, the IoT device should turn on.
- Go all the way back to the Tasks tab home screen, and hold MyTuyaDeviceON until the backgroud color changes meaning its selected. Hit the 3 dots on the top-right and choose Clone. Enter a new name like MyTuyaDeviceOFF , tap on it, then on 1. Termux, then on the pencil again. Change the field Arguments to 1 false. Repeat step 8 to create aditional tasks for the other gangs or sockets by changing the first number if you need to.
Thats all. You can now control the device from tasker. Its a good idea to also hook the task to a profile that uses AutoVoice or IFTTT to change the device status from a smart speaker.


I almost get it to work. Got the uuid, mac and local key. Installed everything in termux, but now i’m stuck with the following.
Opening a telnet session to xx.xx.xx.xx 6668 and switching the smartplug reveals that the protocol version is indeed 3.3.
In termux i’m able to ping to device.
When i enter the following line, i get the error below, i double checked that the id, key, mac and ip are indeed correct.
tuya-cli set –id xxxxxxxxxxxxxxxx –key xxxxxxxxxxxxxxxx –ip xx.xx.xx.xx –dps 1 –set true –protocol-version 3.3
ERR_UNHANDLED_ERROR
Timeout waiting for status response from device id:xxxxxxxxxx
Has somebody any clue as to what might be the problem here.
Maybe try different numbers for dps, Ive a bulb that uses dps 22
The packet capture shows no data cause of the SSL any solution please?
When I originally commented I clicked the “Notify me when new comments are added” checkbox
and now each time a comment is added I get several e-mails with the same comment.
Is there any way you can remove people from that service?
Thanks a lot!